I've been reading Sandor Katz's book The Art of Fermentation and I'm making back-slopped room temperature yogurt, sauerkraut, kim chi, preserved lemons and best of all fermented garlic and chili sauce. Unfortunately the flies got the first salami experiment.
Being a data measurement nerd I wanted to check the the temperature and humidity were about right for each of these ferments - especially the salami. Leaving raw pork meat in the basement for a month and then expecting to eat it seems scary. All the books/internet sites state that getting the temperature range (7 deg C to 15 deg C) and humidity range (75 %RH to 80 %RH) correct is crucial to making salami safely.
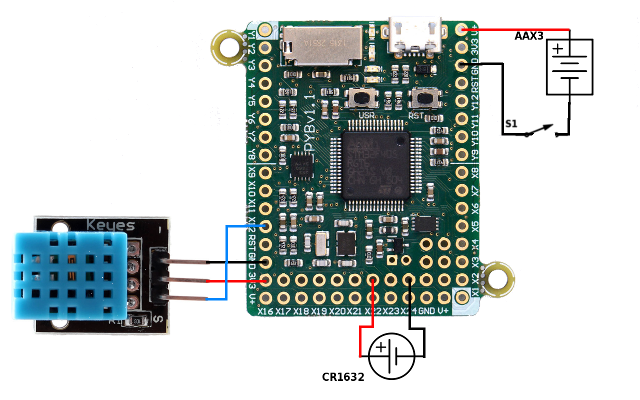
Here's my plans for a battery powered data-logger based on a pyboard and a DHT11 sensor. The battery usage (3 x AA Ni-MH) is low enough that the logger can be left in the hot water cupboard or the basement or on the bench along with the latest ferment experiment for at least a month before the batteries need recharging.
There's several micro-python data-loggers out there and other projects to investigate minimum power usage on a pyboard. This one is really simple and comes with the files for a nice 3D printed box.
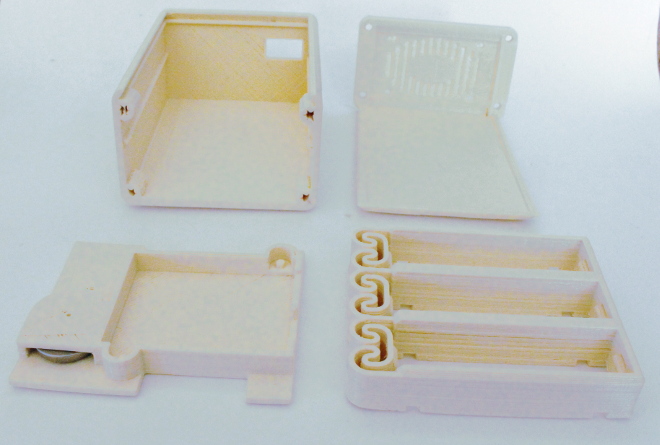
The box has been frankensteined from at least four things on thingiverse. The outer box is a resized version of this RAMPS box. The battery pack is from this flexing battery holder with the bottom cut off it. The pyboard tray is based on this thing with a coin cell holder tacked on the end. The coin cell (CR1632, 3V) provides battery backup to keep the pyboard real time clock (RTC) going when the main battery pack or USB power are not connected.
Construction
Printing
Get the files from thingiverse and print out one each of:
- battery holder
- pytray
- base
- lid
If you print them in this order you can wire up the batteries while the main box prints.
Wire up battery holder and install switch.
For the battery terminals strip the ends of some solid hook up wire and wrap the bare wire through the holes at each end of each battery compartment. Wire the compartments together so the batteries are in series. I put the two outside batteries with the negative terminal at the spring end and reversed the middle battery. Whichever way you do it, mark the holder with + and - signs to match.
Add a switch in one of the lines and add a 90 degree terminal header to go into the pyboard. Hot glue the switch on to the front of the battery holder.
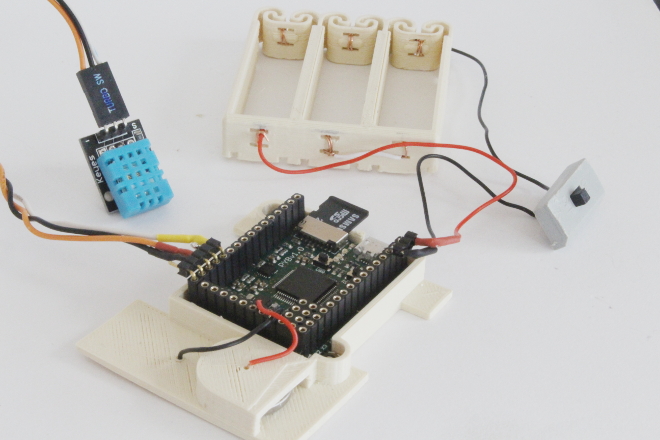
Wire up and install coin battery.
Poke the stripped end of a piece of hook up wire through each hole in the coin battery holder. Push the battery in place to hold the wires in. The negative terminal wire goes along the channel on the underside of the pytray and through the hole to the topside. Strip the other ends of the wire and connect to th GND and VBAT terminals on the pyboard. These won't need to be removed very often so I didn't bother with a connector.
Wire up DHT11 sensor.
My DHT11 sensor came mounted on a small breakout board that included the required 10 k pullup resistor needed between the data pin and VCC. If you have a bare sensor you'll need to add this resistor. Wire the sensor to a 90 degree header as shown. The more accurate DHT22 sensor could be used instead. In this case make sure to change the sensor type in main.py.
Glue the battery holder into the box base (more hot glue) and slide in the pytray
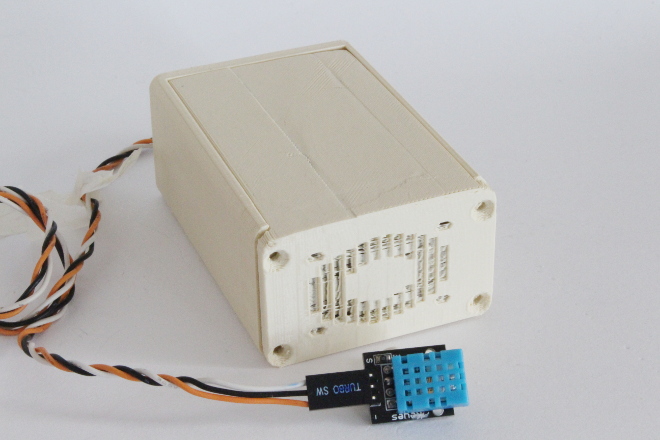
The box can be closed with four screws on the front, but I tend to hold it closed with a rubber band. The DHT11 sensor can be slipped in to the band to hold it in place.
Code setup
First of all with the coin battery connected and the main battery pack switched off set the clock on the pyboard to the correct time. Make a USB connection to the pyboard and open an REPL terminal.
In Linux, to get a REPL prompt, open a terminal and run:
screen /dev/ttyACM0
With the python REPL prompt up type in the following (using the current time and date values):
import pyb
rtc = pyb.RTC()
rtc.datetime((2016, 10, 24, 1, 17, 05, 0))
The clock should now continue to give the correct time whether the pyboard main battery pack is off or on. To be safe I always turn off the main battery pack before connecting the pyboard to the computer via USB.
Copy dht.py and main.py to a micro SD card, insert the card into the pyboard and turn the battery pack on. The orange LED should blink every time a measurement is made. The dht library used is from polygontwist on github.
main.py
import pyb
import dht

dht.init(data_pin='X12',  the_dhttype='DHT11')
led = pyb.LED(3)
rtc = pyb.RTC()

led2 = pyb.LED(1)
led2.on()
pyb.delay(1000)
led2.off()

def measureDHT():
    time = pyb.millis()
    RH, T = dht.measure()
    led.on()
    log = open('/sd/dht.csv', 'a')
    dt = rtc.datetime()
    log.write('{0}-{1:02d}-{2:02d} {4:02d}:{5:02d}:{6:02d}'.format(*dt))
    log.write(', {},{},{}\n'.format(time, RH, T))
    log.close()
    led.off()

rtc.wakeup(300000) # wake time in milliseconds
while True:
    measureDHT()
    pyb.stop() # sleep in low power mode, waiting for the next wakeup trigger
The program measures the DHT sensor every 5 minutes (300 000 milliseconds) opens a file on the SD card, writes the values along with the timestamp, closes the file and goes back to low power mode.
To retrieve data, turn off the battery pack (while the orange LED is off). Remove the SD card and put it in a SD card reader. You should have a file dht.csv that looks like this:
2016-10-29 11:35:54, 1562,63,16
2016-10-29 11:40:53, 1651,63,16
2016-10-29 11:45:53, 1696,63,16
2016-10-29 11:50:53, 1740,62,16
2016-10-29 11:55:53, 1786,61,17
...
Alternatively the pyboard can be used as a SD reader. Turn off the battery pack and connect it via a USB cable to a PC. The board will automaticallically run main.py again and start data logging. To stop this hold down the USR button and press then release the RST button on the board. The orange and green LEDs will cyle through a pattern. Release the USR button when only the orange LED is lit. This will stop main.py being run and the PC operating system should mount the SD card as an external drive. The data file dht.csv can then be copied for analysis.
This box and code could easily be re-purposed to read other sensors.