In a previous post I explained the shape of planes, spheres, and hyperbolic planes in terms of hexagons arranged around either another hexagon (plane), a pentagon (sphere) or a heptagon (hyperbolic plane). I used a photo of a hyperbolic plane someone else had made out of paper, as the 3D model produced by my scripted Sverchok node was not meshed in a nice regular tiling. I thought I'd fix this.
The first step was to write a Sverchok node to make a Blender mesh of the regular tilings of the Poincaré disk. The Poincaré disk is a model of 2D hyperbolic geometry where the points on an infinite hyperbolic plane are mapped inside a planar disk of unit radius.
In a plane or a sphere there are only a small number of regular polygons that can be used to tile the surface. For a plane its limited to triangles, squares and hexagons. These tilings can be described with two numbers, p the number of sides to the polygons used and q the number of polygons that meet at each vertex.
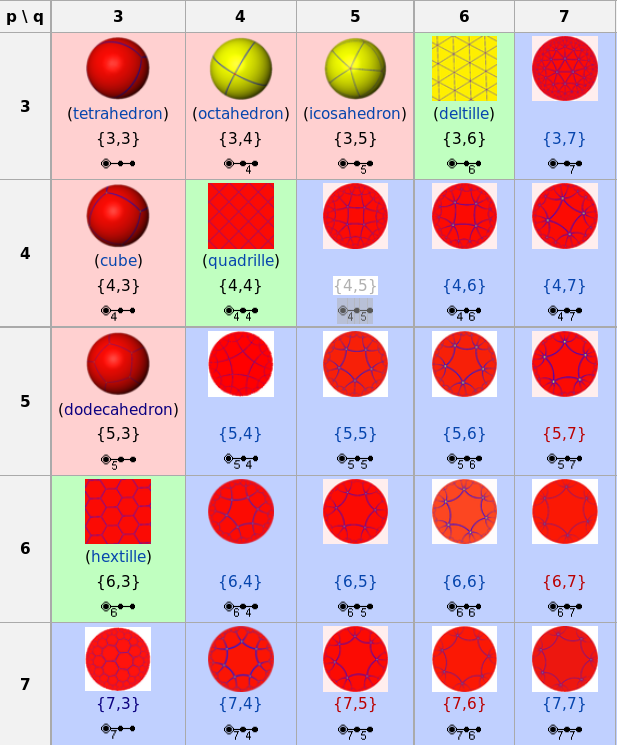
For a sphere the regular tilings are limited to the same combinations as the five platonic solids (tetrahedron {3, 3}, cube {4, 3} octahedron {3, 4}, dodecahedron {5, 3} and the icosahedron {3, 5})
Tilings with any other integer values of p and q (greater than 3) can be made only on a hyperbolic plane.
In the Poincaré disc model a straight line is a circular arc meeting the edge of the unit disk at right angles. The construction method for a tiling consists of placing a regular polygon at the center of the disc and then reflecting the polygon in each side of the polygon. These polygons are then reflected in their free sides and the process repeated until the disc is tiled to the desired resolution. Reflection in a line in the Poincaré disc is equivalent to something called "circle inversion". This is well explained here and hopefully shown in the next diagram.

Here \(O\) is the center of the circular arc through \(\overline{AB}\) which meets the unit circle at right angles. In the Poincaré disc model this is a straight line through \(\overline{AB}\). The polygon \(ABC'D'E'F'G'\) is the circle inversion of polygon \(ABCDEFG\) in the circle centered at \(O\). In the Poincaré disc model this is equivalent to a reflection in the line \(\overline{AB}\). Point \(C'\) the inversion of point \(C\) lies on the line \(\overline{OC}\).
The radius \(r\) of the circle centered at \(O\) is the length of the line \(\overline{OA}\)
\[r = \left | \overline{OA} \right |\]The position of \(C'\) on the line \(\overline{OC}\) can then be found from:
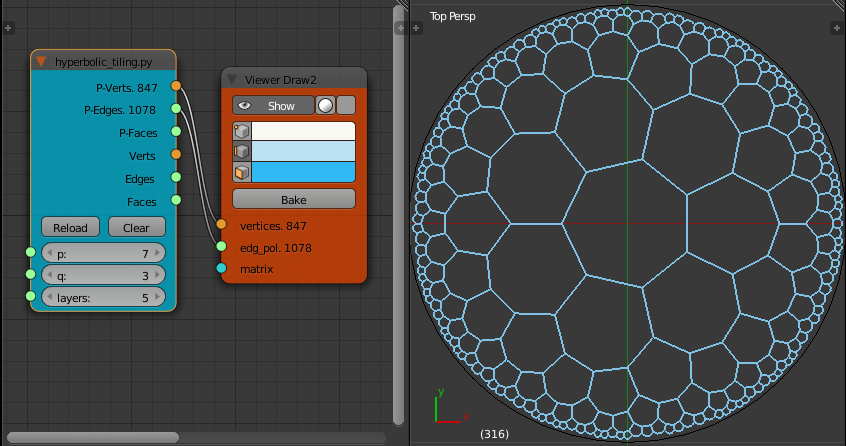
\[r^2 = \left | \overline{OC} \right | * \left | \overline{OC'} \right |\]This Sverchok scripted node hyperbolic_tiling.py implements the regular tilings of the Poincaré disk. (See earlier post on how to use a Sverchok scripted node in Blender). The hardest part of coding this is keeping track of the vertices and edges that are already in place to avoid making duplicates.
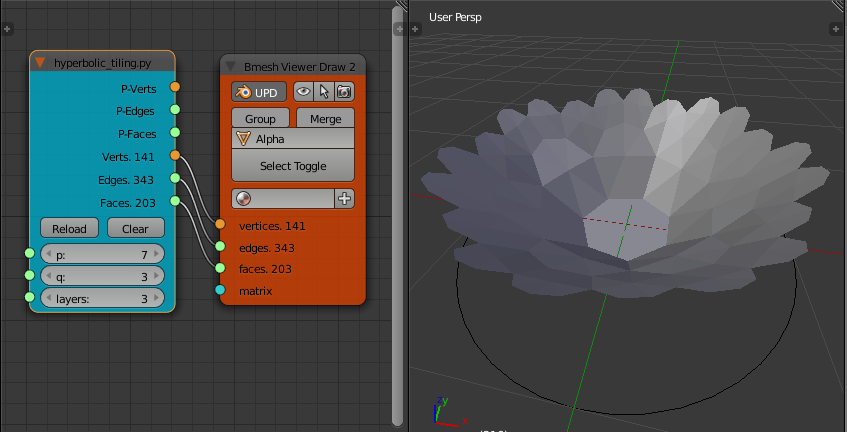
I now want to turn this flat mesh into a 3D mesh where each polygon has equal length sides. This can be done with a mass spring network where each edge of the mesh is modeled as a spring with a fixed rest length. The closest I can get to this in Blender is to use the "Soft Body" physics with the "Soft Body Self Collision" enabled.
In "Soft Body Self Collision" each vertex is surrounded by an elastic virtual ball. The physics engine stops vertices going inside the balls of other vertices during the simulation. This can be used to unfurl the Poincaré disk tiling into a 3D surface.
The final shape of the surface depends quite strongly on initial conditions. If we run the physics animation on a flat surface little happens. The second set of outputs on the Hyperbolic Tiling node output a version of the tiling that is bowl shaped rather than a plane. Also each face has been "poked" to only give triangular faces.
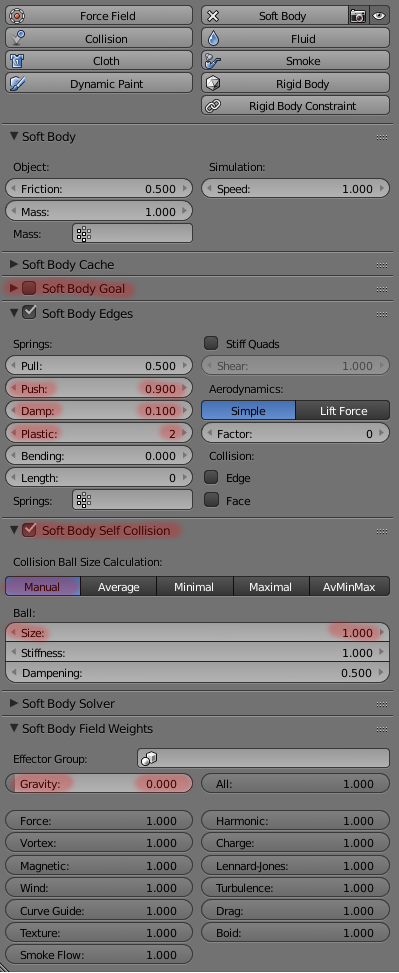
Bake the result of this second set of outputs to give a mesh. Add a "Soft Body" modifier to the mesh. The parameters I've found that produce the best results are shown in the screen capture on the right.
The parameters that differ from their default values are highlighted in red. Make sure "Soft Body Goal" is OFF and "Soft Body Self Collision" is ON. Experiment with some of the others to improve the speed or evenness of the final edge lengths. I've found that my edge lengths never come out all equal. If anyone can come up with settings for "Soft Body" that give a result with a better ratio of minimum edge length/maximum edge length I'd love to see them in comments.
On my computer (i7, 2.8 Ghz, 4 GB RAM) the soft body solver is unstable when working on more than 250 to 300 faces. It either works very slowly and/or the mesh floats off the screen away from the origin.
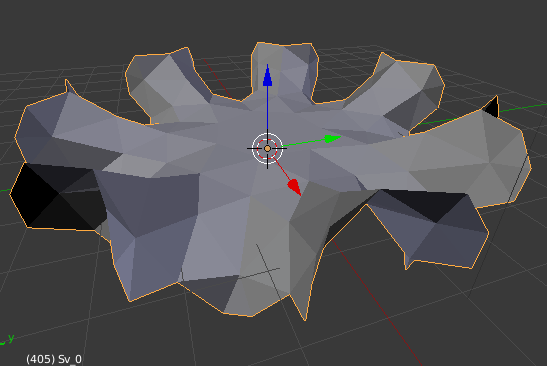
A rotationally symmetric input mesh produces a symmetric output mesh (mostly). If you distort the input mesh a little the output mesh may be much less symmetric. For example, the p = 7, q = 3 tiling seems to have two final shapes depending on initial conditions. If you start with the symmetric output of the node it settles down to a surface that has has 7 wrinkles around the outside edge. If you add any distortion ("Randomize" in edit mode) before applying the soft body modifier the final shape is often much less symmetrical with ~3 major wrinkles around the outside.
To produce the hyperbolic football tiling:
- Use the Sverchok node to create a p = 7, q = 3, layers = 3 tiling mesh
- Add a soft body modifier with the settings described above
- Run the animation until the surface has unfurled.
- Apply the soft body modifier
- Add a "Subdivision Surface" modifier with 1 subdivision and apply it.
- Apply a white material to the whole mesh
- Select the central vertex and "Select Similar" vertices with a similar "Amount of connecting edges".
- Expand the selection (Ctrl+) to select all the heptagons.
- Apply a black material to the heptagons